
Using clipless pedals is a rite of passage for many beginner road, gravel, and mountain bike riders. Sometimes called clip-in, click-in, or SPDs by riders, these pedals provide a more secure connection between a cyclist’s feet and the bike. Riding clipless pedals helps improve efficiency by increasing power transfer and allowing riders to pull up with each pedal stroke while also pushing down as on traditional flat pedals.
But selecting the perfect clipless pedals and shoes for your riding can seem overwhelming. Manufacturers sell dozens of pedals and hundreds of compatible shoes. I’m here to help you simplify the process, pick the right ones, and confidently get out on the road or trail.
Why Are They Called Clipless?
Before diving into any details on pedals or shoes, let’s tackle everyone‘s Seinfeldian question about clipless pedals—Why are they called clipless pedals if you clip into them?
The term “clipless” seems to be a misnomer to many. However, the “clip” in clipless refers not to the act of clipping in, but to a pedal type popular until the late 1980s. Before clipless pedals became the go-to choice for cycling enthusiasts and racers, riders used toe clips and straps to secure their feet to the pedals.
These pedals used metal or plastic cages (clips) attached to the front of the pedal that held a rider’s shoe in place. Leather or nylon straps were used to cinch down and prevent the rider’s foot from slipping out. Road racers also often attached notched cleats to their cycling shoes to further lock the shoe to the pedal.
In the mid-1980s, pedals featuring a mechanical attachment system that paired with a special plastic cleat affixed to cycling shoes hit the market. Operating like ski boots and bindings, these pedals securely attach the rider’s shoes to the pedals, and they’re easy to use. Clipless pedals disengage when the rider twists their foot, and they release quickly in the event of a crash. They soon gained popularity since they were much easier and safer to use than toe clips and straps.
And, since these pedals were without clips—“clip-less”—they became known as clipless pedals.
Another often-asked question about pedals is, “Why are many new bikes sold without pedals?” The reason is that many riders want to add a specific brand of clipless pedals. It’s easier (and cheaper) for bike brands not to include pedals than provide ones that more than half of buyers won’t want.
Get the Right Pedals
Before clicking the “buy now” button for a new set of clipless pedals, carefully consider your riding needs. While you might exclusively ride a road bike on paved roads, pedals labeled as “road” models might not be your best choice. Similarly, people who ride gravel bikes often use pedals designed for mountain biking.
Remember, it’s your bike and your riding comfort. If you don’t want to use clipless pedals, you don’t have to. Many riders get on fine with traditional flat pedals. Even though I’ve ridden clipless pedals for over thirty years, I still use flat pedals on my commuter bikes and often ride flat pedals on technical mountain bike trails.
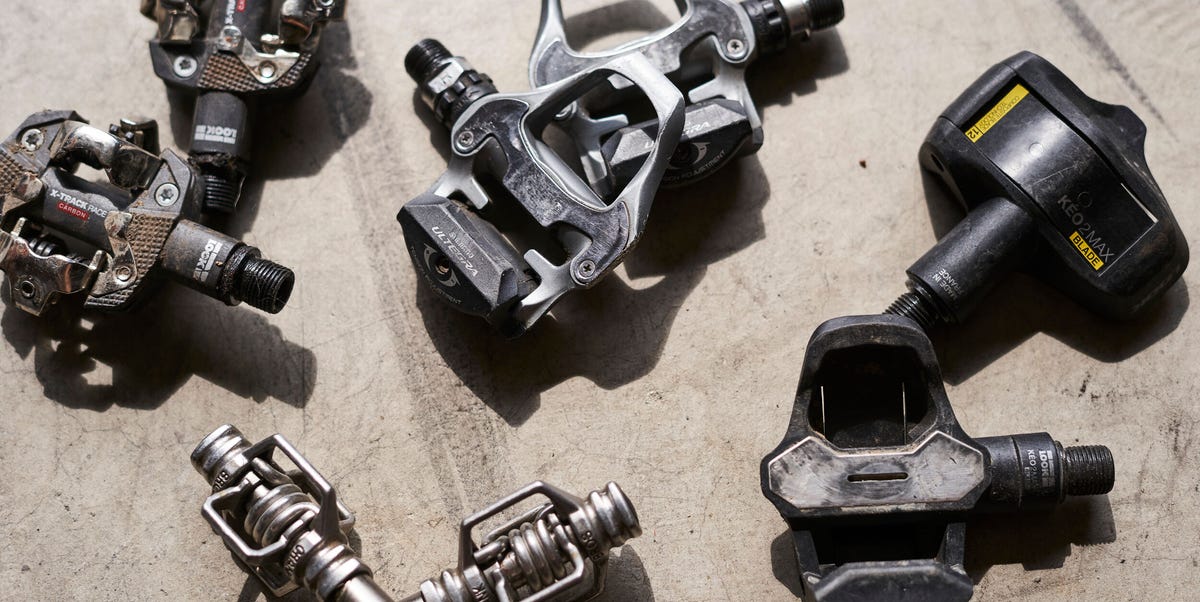
Clipless Pedal Types
The majority of clipless pedals are in two flavors: Single-sided or dual-sided. This means the number of surfaces on the pedal that the cleats on your shoes can clip into.
Single-Sided
Trevor Raab
Most single-sided pedals are intended for use on paved surfaces. These are often marketed as road clipless pedals. These pedals have a mechanical binding on one side, and the other side is slick metal or plastic. That makes them best for cyclists who only ride on paved roads.
However, even if you only ride on the road, single-sided road pedals may not be right for you. These pedals are slightly trickier to click into. Due to this, I do not recommend them for cyclists who often need to unclip during rides. (For example, areas with heavy traffic or if you stop and start a lot.)
Most single-sided road pedals use a plastic cleat held onto the shoe with three bolts (commonly called 3-bolt cleats). 3-bolt cleats stick out from the bottom of compatible shoes. The non-recessed cleats and minimal tread on their soles make 3-bolt road shoes less than ideal for walking.
Best for Road
SHIMANO PD-R7000 Road Bike Pedal
Best Power Meter Pedals
Garmin Rally™ RS200 Dual-Sided
Trevor Raab
Often sold for mountain bike or gravel riding, dual-sized clipless pedals are the best choice for many cyclists. Dual-sided pedals (colloquially referred to as SPDs) can work well for any rider, regardless of terrain, bicycle type, or discipline. While not as aerodynamically shaped as single-sided road pedals, dual-sided clipless pedals offer several advantages, particularly for riders new to riding with clipless.
Since they have two sides to clip into, dual-sided pedals give you double the chance to engage the pedal (so you’re not fumbling in the middle of an intersection). I also find dual-sided pedals easier to clip into—the pedals and shoes work together to locate the cleat. This makes it easier to clip in.
Another upside of dual-sided pedals is the walkability of the shoes. Pick dual-sided pedals if your rides include walking in a city or town, dismounting for obstacles, or walking hills too steep to ride.
While road shoes (with slippery soles and slick, plastic cleats) are hard to walk in, dual-sided pedals use metal 2-bolt cleats mounted to lugged-sole shoes for increased traction. This walkability is why off-road and gravel riders choose dual-sided pedals.
There are many sizes of dual-sided pedals, so pick the one that makes you feel most comfortable, confident, and secure. Some riders prefer the small size of Shimano’s XTR, XT, and M540/M520 pedals or the low weight and four-sided entry of Crankbrothers’ Eggbeater models. Other riders, even those riding gravel or road, choose pedals designed for trail, enduro, or downhill mountain biking. While heavier, these models have a larger platform that provides extra foot support and stability if you need to pedal without being clipped in.
Wahoo notably makes dual-sided Speedplay road pedals. However, the cleats for these attach to 3-bolt-compatible (or hard-to-find 4-bolt-compatible) shoes and stick out from the bottom of the soles. This doesn’t make them super walkable. Although they have dual-sided entry, these Speedplay pedals are best for purely road cycling use.
Finally, some brands offer pedals that combine flat and clipless into one—one side has an SPD-style mechanism and the other a traditional platform. These are great for commuting or general-purpose riding. Wear standard sneakers for a quick ride to the store or a casual ride on the bike path; wear clipless cycling shoes for your longer rides.
Best for General Riding
SHIMANO PD-M540 SPD MTB Pedals
Best Lightweight
Crankbrothers Eggbeater 3
Best for Trail Riding
SHIMANO PD-M8120 Deore XT
Best Commuting
SHIMANO PD-T421 Pedals Get the Right Shoes
Most clipless shoes are designed to work with either 2-bolt or 3-bolt cleats, not both. Double check that the shoes you choose are compatible with the pedals you will use before purchasing clipless pedal shoes. Typically, 3-bolt pattern shoes are sold as road shoes. Cycling brands usually put shoes with a 2-bolt interface in their mountain, gravel, or commuter collections.
Some shoes (particularly those for indoor cycling) have soles with both cleat patterns. There are also adaptors made to attach two-bolt cleats to three-bolt shoes. However, I recommend selecting clipless shoes specific to your type of pedals and cleats.
What and How to Buy
After you decide on the type of pedals you will use, it’s time to purchase the shoes.
Clipless-compatible cycling shoes can cost from less than $30 on Amazon or AliExpress to upwards of $700 for premium-level road shoes. There are many options in materials, aesthetics, and closure systems—from clipless-compatible shoes similar to those used for hiking or running to high-tech, lightweight shoes preferred by professional road racers and cross country mountain bikers.
When picking shoes, comfort is important. While you will not be walking (as much) in cycling shoes, you still need to ensure they feel comfortable. Hot spots and foot pain are common among cyclists when they use shoes that don’t fit right. And remember, a high price does not guarantee good fit—I have tried $100 shoes that fit me great and $400 shoes that hurt my feet. If shoes hurt when you try them on, the pain probably won’t disappear while riding.

Trevor Raab
Unless you know a brand and its shoe fit, I always recommend finding a local bike shop that stocks a variety of shoes that interest you. Then, go try them on to confirm they fit and that you like the styling. When trying on cycling shoes, check fit wearing the socks you most often wear while riding. If you wear thin cycling socks, wear those for checking fit.
Don’t forget to check walkability when buying shoes that you will use for anything other than strictly riding on paved roads (such as mountain biking, gravel riding, or touring). Off-bike comfort is secondary, but can be super important if you encounter a hike-a-bike section or walk around a town for lunch or sightseeing.
For example, I once brought expensive clipless shoes for a week-long mountain bike trip in Europe. The first day included over two hours of off-bike hiking up steep climbs; it killed my feet. For days two through six, I used the flat pedal-specific shoes I brought along (and changed my pedals) so I could be comfortable walking.
It might cost you slightly more to buy your shoes from a shop than online, but you’ll get to check the fit and style before paying for them and dealing with the hassles of returns if they don’t fit. A shop can also help you to install the cleats and pedals if needed.
Closure Methods
Popular closure systems include laces, Velcro, and dials. And some cycling shoes use a combination of them. However, none are necessarily superior to another. Pick the one that best meets your riding needs, style, comfort, and budget.
Laces
Trevor Raab
Laces have a classic look, and they’re easily repairable. You can also customize the shoelace color if you want. The downside to laces: You cannot adjust them on the bike. If a lace comes loose (or is too tight), you need to stop and retie it.
Velcro
Trevor Raab
Hook and loop closures (aka Velcro) have been used on cycling shoes for decades. They are lightweight, easy to adjust on a ride, and low-cost. Fewer brands use full Velcro closures than in years past, but the system is effective and liked by many riders.
Dials
Trevor Raab
Dial closures have become the go-to choice for cycling shoes over the last decade. Boa makes the dominant system, and you will find the company’s dials on almost every brand of cycling shoe. They’re easily adjustable while riding, and you can microtune your fit anytime on a ride.
The Boa dials (metal or plastic, usually depending on shoe price and usage) tension laces that wrap over the foot. The laces, which resemble fishing line, are lightweight and tough. Shoe brands employ one or two dials (again, depending on price and use), sometimes pairing a dial with a Velcro strap. Additionally, Boa has a lifetime warranty on its system.
Great Clipless Shoes for Beginners
Best Boa Road
specialized Torch 1.0 Road Shoes
Best Road Deal
Bontrager Solstice Road Cycling Shoe
Best 2-Bolt Deal
Bontrager Quantum Mountain Bike Shoe
Best 2-Bolt Lace-Up
Giro Privateer Lace Shoe
Best 2-Bolt Casual
Adidas Velosamba Installing Cleats and Setting Tension
Trevor Raab
Follow your pedal manufacturer’s guidelines for torque settings (and any special instructions) when installing your cleats. I advise cyclists to start riding clipless with float cleats rather than fixed-position variants. Float cleats usually come stock with pedals.
While some fitters now recommend that riders install cleats as far rearward as possible on cycling shoes, I usually set up mine with a neutral placement. Check out this guide where test editor Dan Chabanov walks riders through quick cleat setup tips.
Some new clipless riders dial up the release tension on their pedals out of concern that they will pull out of them too easily. However, this can lead to getting stuck in the pedal during a panic situation if you aren’t used to unclipping.
Set your pedal-release tension on the lower side for the first few rides. After you become accustomed to riding with clipless pedals and feel comfortable clipping in and out, you can adjust the tension as needed to suit your riding and strength.
Practice Makes Perfect![]()

After installing your pedals on your bike and cleats on your shoes, do not head directly onto busy roads or technical mountain bike trails. Practice riding with clipless on easy terrain until you feel safe.
If possible, I recommend practicing first on an indoor trainer before heading outside. This will get you accustomed to the basic motions of clipping in and out of the pedals. Starting indoors also allows you to adjust cleat position or pedal tension and re-test.
Once you know how to clip in and out, head outside to practice riding your new clipless pedals. Start somewhere without traffic, such as a park or cul-de-sac. Many new clipless riders encounter issues when approaching a stop and are unable to unclip from their pedal. To learn this skill, head to a grassy field at a school or park. This way, you will have a softer landing if you fall over.
A couple of months ago, I experienced the sense of panic that many new riders feel. As I was slowing down for a stoplight, I couldn’t get my foot unclipped. Luckily, I avoided toppling over. This shows that even experienced riders occasionally can have clipless pedal mishaps.
Also, practice clipping into your pedal outside. Your goal is to clip in without looking down at your pedals. Many clipless riders (new and experienced) look at their pedal when clipping in, but this can be dangerous to you or other cyclists. Look forward; practice this by picking an object and staring at it while clipping into your pedal with your foot. Repeat this until you develop a sense of where your pedal is and where it meets the cleat.
I find it easier to clip into pedals when riding dual-sided pedals. Part of this is having double the sides as single-sided road pedals. It is also thanks to the entry angle of 2-bolt cleats—You can more easily step onto the pedal and clip in. Road cleats often require slightly more mental focus to engage the pedal.
A useful tip for the road or trail: Remember to position your unclipped foot forward (approximately the two o’clock position for the right foot or ten o’clock position for the left) when you stop. This allows you to start from a stop with your clipped-in foot and catch the other pedal to clip in when the cranks turn.
Clipless Pedal Maintenance 
Trevor Raab
Don’t forget to keep your pedals and cleats in good working order. Check pedals for signs of wear or damage. Look for bent parts and check the cleats for excessive wear if you experience problems getting clipped in or out.
Most metal 2-bolt cleats are rather durable. (Brass Crankbrothers cleats, however, tend to wear quickly in sandy or muddy conditions.) Since they often strike rocks and roots, clipless mountain bike pedals see more abuse than road or gravel pedals. After each ride, remove any stones or debris that is stuck in them. A drop of light lube in the spring helps rust from forming. Use a wire brush to remove any surface rust that appears on your cleats or pedals.
Road pedals are low maintenance. However, plastic 3-bolt cleats can wear fast, especially if you walk in them. When plastic cleats become overly worn, they release without warning or even break. Replacing your cleats costs a lot less than a visit to the emergency room.
When replacing cleats (particularly plastic ones), opt for the pedal manufacturer’s replacement parts to ensure compatibility and quality. Be extra careful when purchasing road cleats online. Buy from reputable retailers—a Bicycling test team rider purchased imitation Shimano road cleats that snapped after only 1,500 miles. Saving a few bucks on cleats is not worth potential problems.

As Deputy Editor, Tara Seplavy leads Bicycling’s product test team; after having previously led product development and sourcing for multiple bike brands, run World Championship winning mountain bike teams, wrenched at renowned bicycle shops in Brooklyn, raced everything from criteriums to downhill, and ridden bikes on six different continents (landing herself in hospital emergency rooms in four countries and counting). Based in Easton, Pennsylvania, Tara spends tons of time on the road and trail testing products. A familiar face at cyclocross races, crits, and bike parks in the Mid Atlantic and New England, on weekends she can often be found racing for the New York City-based CRCA/KruisCX team. When not riding a bike, or talking about them, Tara listens to a lot of ska, punk, and emo music, and consumes too much social media.