
Shooting wildlife in low light means pushing your ISO to uncomfortable limits. Here’s how to handle the images in post.
Coming to you from Matt Shannon, this detailed video walks through a real-world high-ISO recovery workflow using images Shannon shot of hummingbirds in rainy, dark conditions in British Columbia. The centerpiece of the workflow is DxO Pure Raw 6, which Shannon uses as a first pass before bringing images back into Lightroom for final editing. The integration is straightforward: you export directly from Lightroom into Pure Raw 6, it processes the raw file, and you reimport the result. One thing worth knowing upfront is that any adjustments you’ve already made in Lightroom won’t carry over, since Pure Raw 6 works on the original raw file.
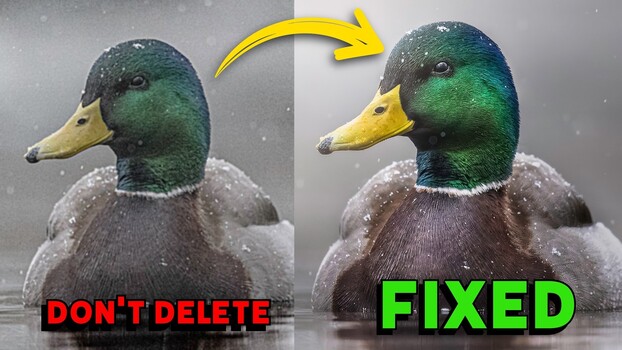
Shannon tests the software across a range of ISO values, starting at ISO 6,400 with a mallard shot and working up to ISO 25,600. At each level, he shows the before and after side by side, zoomed in to 600%, so you can see exactly what the denoising is and isn’t doing to fine detail like feathers and water droplets. He also explains the difference between the D Prime 3 and D Prime XD3 processing modes. The XD3 mode adds a bit more sharpening and is better suited to extreme ISOs, while D Prime 3 is faster and more practical when you’re batching a large number of files. Shannon also points out that Pure Raw 6 builds lens and camera body profiles, so it accounted for the fact that he was shooting with an OM System OM-1 Mark II paired with a 100-400mm lens, rather than applying a generic correction.
Beyond noise removal, Shannon also covers post-processing in Lightroom after the DxO pass, including how he uses linear gradients, radial gradients, and selective adjustments to add depth and direct the viewer’s eye through the image. It’s worth watching just to see how much the combination of denoising and intentional light shaping can change the feel of a shot taken in flat, overcast conditions. He also spends time on DxO Photo Lab 9, which he positions as a standalone alternative to Lightroom for users who want to skip the subscription entirely. Photo Lab 9 includes a high-fidelity compression feature that can reduce raw file sizes by up to four times without sacrificing image quality, which is a real consideration if you shoot high-volume wildlife or sports and storage costs are adding up. Shannon walks through the interface and compares its subject selection tool directly against Lightroom’s, with a clear opinion on which one performs better.
Check out the video above for the full breakdown from Shannon, including the Photo Lab 9 walkthrough and how he handles the trickiest high-ISO shots in the set.