
Ableton Live 12, released in 2024, introduced five MIDI Generator tools designed to spark ideas across different stages of the creative process. Here’s how they work.
We’ve all got pretty strong opinions about AI, in either direction of the argument, especially when it comes to the creation of anything artistic. So it’s worth being clear from the outset: Ableton’s MIDI Generators aren’t AI in the machine-learning sense. Instead, they’re algorithmic tools that generate patterns using rules, probability, and randomisation rather than models trained on musical data.
In this guide, we’ll explore what they actually are – and more importantly, get you creating with them.
What are MIDI Generators?
As stated above, in their simplest terms, MIDI generators are algorithmic composers that use predetermined mathematical formulae to create musical phrases.
Although each generator will offer its own approach, each will present you with a selection of controls that allow you to tweak the algorithm. Perhaps the speed of notes or the range of pitch, for example. Then, when you hit ‘generate’, it will use its own maths and a degree of randomness to create a pattern.
These tools are great for getting started. Notes are, of course, still editable, but they could get you over a creative block or offer something your track would never have arrived at otherwise.
Before we begin, it’s important to understand that it’s highly likely your examples won’t sound like ours – that’s the point. So we’ll share the process as we go, but don’t worry if yours is different.
If you haven’t found them yet, Ableton Live 12 introduced two collections of tools that can be used directly within the piano roll. You’ll find them in the final two panels of the clip’s properties.
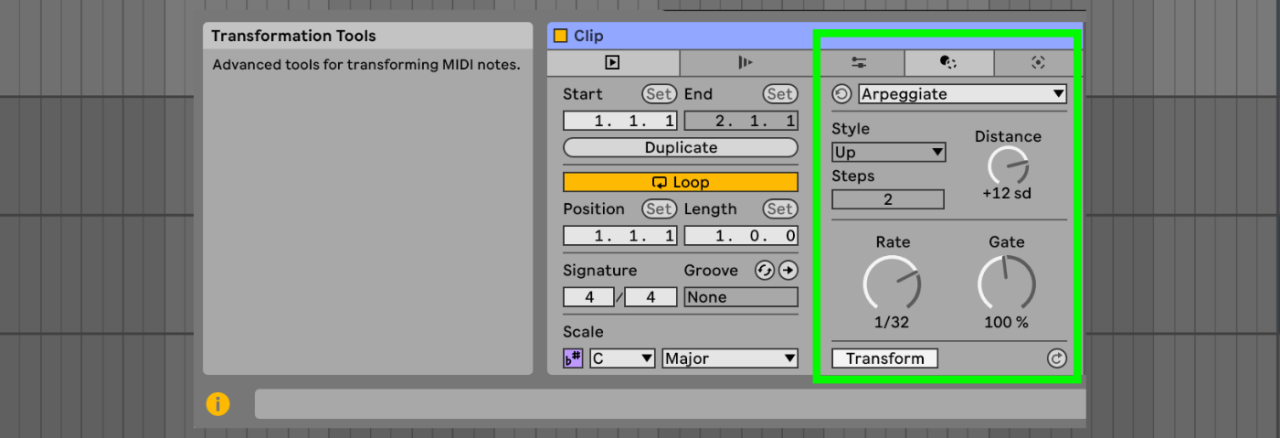
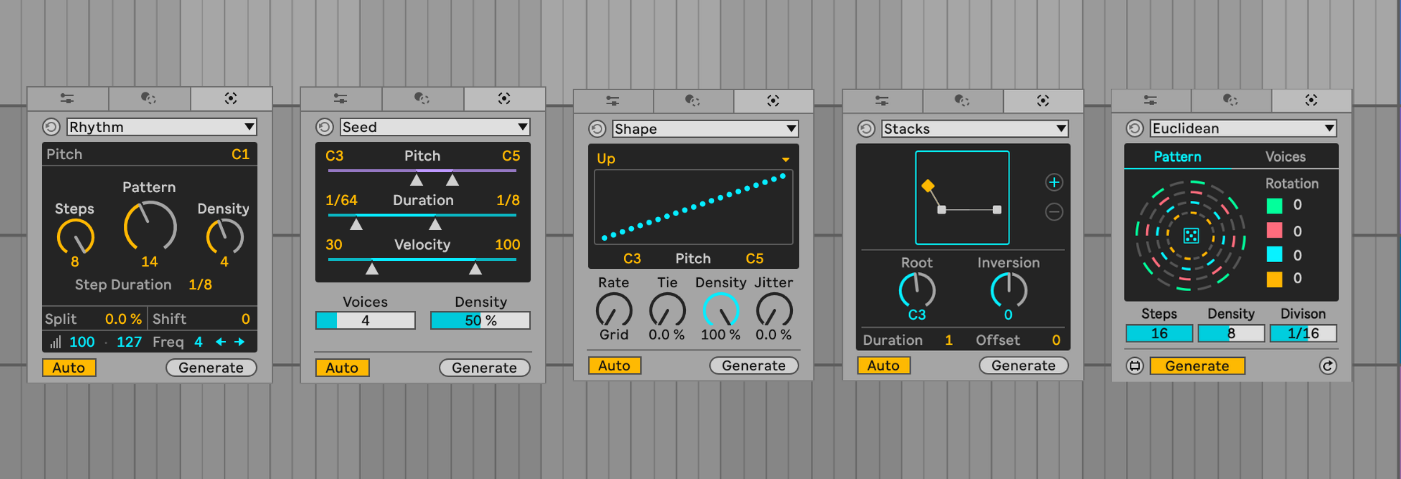
The Transformation Panel is fourth from the left and contains the Transformation Tools. These tools allow you to change the notes in your clip, maybe quantise them, or strum the notes of the chord. They deserve their own exploration, but it’s the Generative Panel, the final panel of five, where you’ll find the Generative Tools, and here is where we’ll stay. There are five tools here, and we’ll explore each one.
Choose Auto On or Off
The Auto toggle controls how results are generated. When Auto is on, changing any parameter automatically creates a new result. When it’s off, you need to press Generate manually.
For the examples below, Auto is turned off to prevent accidental results when adjusting settings. It gives us more control.
Generated Length
You might assume the tools generate content across the entire clip, but they actually generate only within the Loop Brace. Because the Loop Brace is often the same length as the clip, this isn’t always obvious.
If you want four bars of generated material, set the Loop Brace to four bars.
This also lets you generate new ideas inside specific parts of an existing clip, rather than replacing the whole thing. Very handy for drum fills, for example.
Rhythm focuses, unsurprisingly, on generating rhythmic patterns, so we’ll use it to create a beat. Start by creating a new MIDI track and loading a drum kit you like. In this example, I’m using the 808 Core Kit, with the 808 Shaper preset on Saturator followed by Drum Buss in its default state.
Next, create a blank MIDI clip and open Generative Tools, which defaults to the Rhythm module.
The main menu normally controls pitch, but when working with a Drum Rack it displays the individual voices of the kit instead. Select your Kick Drum and click Generate. Most of the time, you’ll get a four-on-the-floor pattern.
One important detail: Rhythm only works on one voice at a time. You can generate a pattern for the kick, then move on to the clap or hi-hat, but you can’t process the entire drum rack at once. This means building the beat voice by voice (or layer by layer).
Once your kick pattern is generated, you’ll see the notes selected in the piano roll. Before moving on, deselect the notes. If you leave them selected, the next generation step will replace them. Since we want to build the beat gradually, each voice needs to remain in place once we’re happy with it.
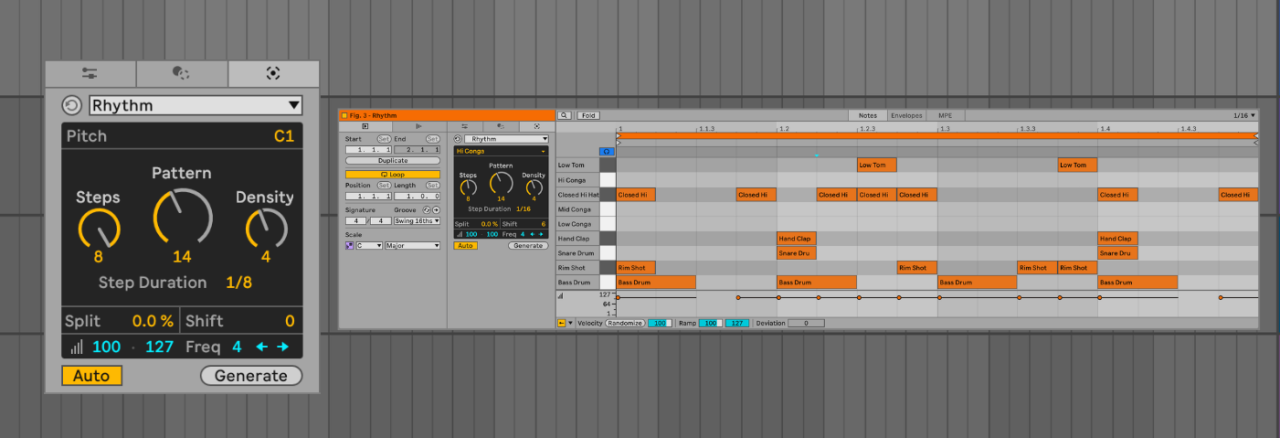
Now choose another voice from the menu. Let’s try a closed hi-hat. Click Generate, then use the three available controls to shape the groove:
Steps determine the length of the pattern
Pattern changes the placement of notes
Density adjusts how many notes appear
After generating the hi-hat pattern, you’ll notice the kick notes turn grey. This simply means they already exist in the clip but are not currently being controlled by the generator. The coloured notes are the ones actively being generated and will change as you tweak the parameters or click Generate again. The grey notes remain untouched.
This behaviour applies to all generators: grey notes are fixed, coloured notes are active.
Finally, place the snare or clap manually on beats 2 and 4 to establish a strong backbeat. From there, you can experiment by adding elements such as a rim shot or low tom with the generator, quickly producing rhythmic variations you might not have programmed yourself.
Top Tip: The Shift parameter moves the generated pattern right on the piano roll. Try adjusting it to reposition the rhythm and explore variations. Don’t forget to experiment with Offset as well – it’s another simple way to generate fresh rhythmic ideas.
Seed generates melodic material, so we’ll start by using it to create a bass line.
Create a new MIDI track and load a bass sound you like. Here, Wavetable uses the Basic FM House Bass preset with Tri + Sub selected. Add a blank MIDI clip, then open Generative Tools and select Seed.
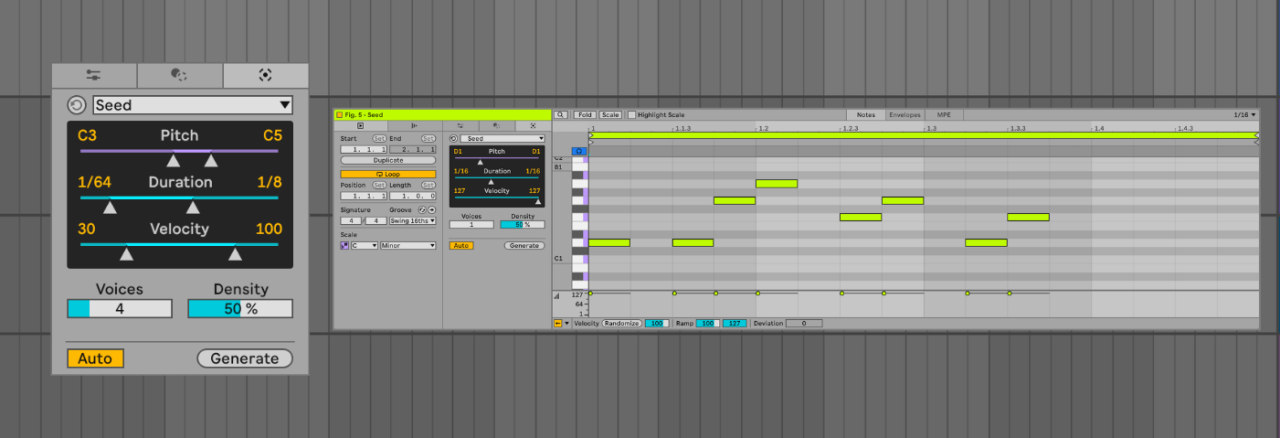
Use Seed to create a bass line, setting a narrow pitch range to keep the generated notes within the lower Set both Duration sliders to 1/16 to create a bass line with some space between notes. Duration controls the length of each generated note, so setting the range to 1/16–1/16 ensures every note is the same length. Widening this range introduces variation in note lengths.
The same principle applies to Velocity. Setting the range to 127–127 keeps every note at the same velocity, while a wider range would introduce dynamic variation.
Next, set Voices to 1, since bass lines typically play a single note at a time, and set Density to 50%. Press Generate, then repeat until a bass line appears that works for the track.
Earlier, Auto was turned off to maintain control while exploring the tool. For this stage, however, it’s worth turning Auto back on and letting the clip loop while adjusting parameters, so the results can be heard in real time.
Top Tip: Generated notes follow the key set in Ableton. Choose the harmonic centre before generating, as changing the key will produce different results.
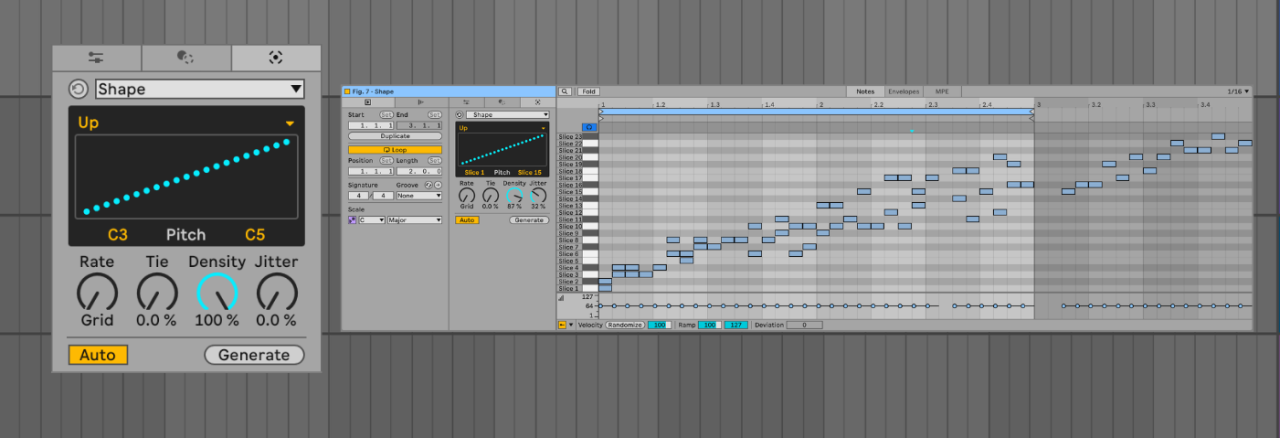
Shape redistributes existing notes, making it useful for creating vocal chops. Add “L10 Demo Voc Reverb 2” from the Core Library to an audio track, then slice it to a new MIDI track using 1/8-note divisions. Once sliced, delete the original audio track, as it is no longer needed.
The resulting MIDI clip will play the sample slices in their original order. Open Generative Tools and select Shape from the menu to begin redistributing the slices.
The displayed shape determines how the notes are played. Different shapes can be selected, or a custom one can be drawn. In this example, the Up shape is used, though any shape that suits the part can be chosen.
The controls help reorder the notes (or slices, in this case). Rate sets the note length, Tie allows notes to extend beyond that length, Density controls how many notes are generated, and Jitter introduces variation from the displayed shape. Adjust the controls in any order and press Generate to create new variations.
Generators might take away some of the hands-on fun of sampling and making music, but they can also open the door to unexpected workflows and creative directions
Stacks focuses on generating chords and offers more depth than it first appears. Create a new MIDI track and load a pad sound of your choice. This example uses the Stereo Saw preset in Drift. Add a blank MIDI clip and consider extending it to give the progression more room. A four-bar clip works well here, with the loop brace also set to four bars. Then open Generative Tools and select Stacks from the menu.
The diagram displays a visual representation of the chord being generated. Clicking it will play the chord for preview. Dragging the diagram up or down cycles through different voicings, adding or reducing complexity as you move through the options.
Set the root note to suit the track, then use the plus icon to add additional chords. Adjust the voicings to build a progression – in this example, four chords. The Inversion control rearranges the order of notes within the chord, allowing the same chord to be heard in different positions.
As with Seed, Duration controls how long the notes last. Here it is set to 1 (one bar), with Offset set to 0.
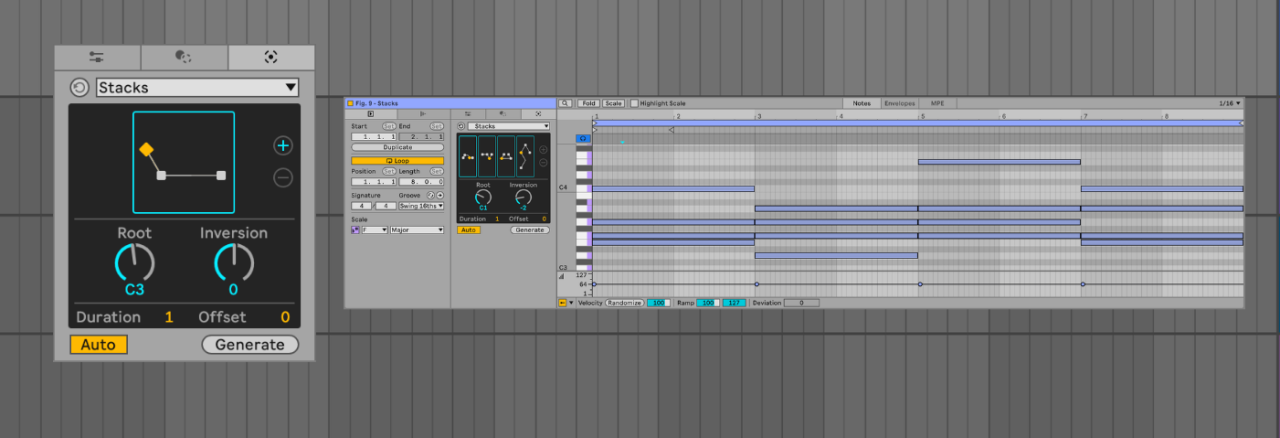 Hit the plus button (+) on Stacks to add chords to your progression
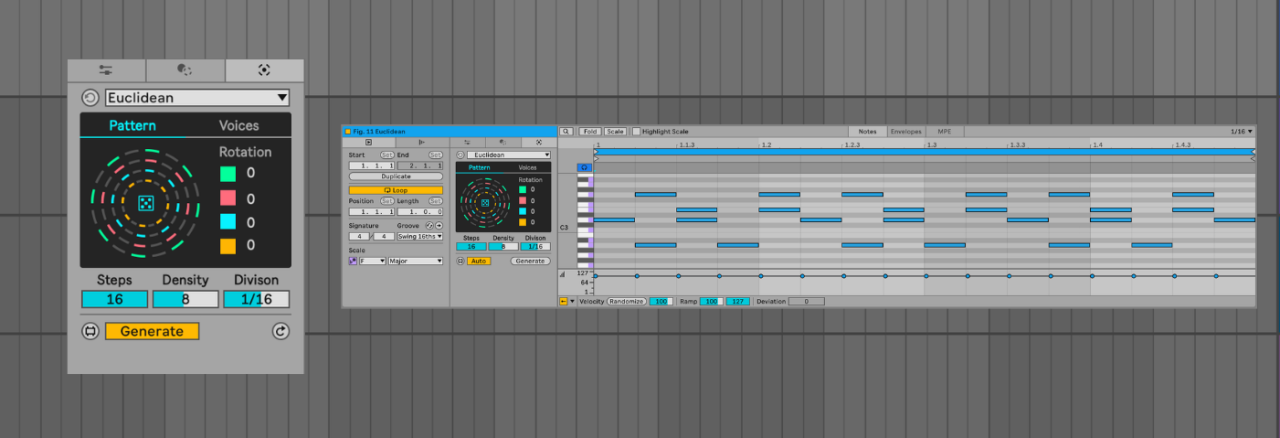
Euclidean generates repeating patterns of up to four notes, making it ideal for plucky parts and complex rhythmic patterns, including polyrhythms.
Create another MIDI track and load a plucky sound of your choice. This example uses the Plastic Lead preset in Meld. Add a blank MIDI clip, open Generative Tools, and select Euclidean from the menu (fig. 10).
Before generating a pattern, choose the notes each voice will use. Start by considering which notes will work with the existing bass line and chords. Open the Voices tab, select the notes you want to use, and disable any unused voices. In this example, four notes are chosen that fit the bass line and chord progression while staying within the root key.
Steps sets the number of steps in the pattern, Density controls how many of those steps are filled, and Division sets the rhythmic value.
At this stage, the selected notes will likely play together. The real variation comes from rotating the position of each note around the circle. Press the dice to randomise the rotation, then adjust Steps and Density until a pattern emerges that fits the track.
The following example plays all the generated parts together.
Next steps
Ableton’s generative tools reward experimentation as much as expertise. The more they’re pushed beyond their obvious uses – Seed for melody or Rhythm for percussion – the more interesting the results can become.
The exploration doesn’t end with Ableton’s built-in devices. Ableton Suite also includes generative tools by developers such as Iftah Gabbai and Philip Meyer, which are available in the Attack Store.
Don’t have Ableton Live? Buy it here. Heads up, it’s an affiliate link. If you buy through them, we may earn a small commission (it doesn’t affect the price).
Follow Attack Magazine
Related
Author Matt Donald
13th March, 2026