
 7 min read
Some of us ride with a goal in mind to get faster, stronger, and go farther. At this point, there are so many metrics: heart rate, cadence, speed, and distance to name a few. While all of these are important, there is one north star data point: power.
I have spent over ten years in the fitness industry as everything from a personal trainer to running my own fitness business. As someone who is also a USA Cycling certified coach, I always love to tease out things that are trends vs. pillars of training. The cycling metric I always go back to as the truest picture for benchmarking is power. “Other than the bike, power is the best tool we have in cycling,” says Joe Friel, founder of Training Peaks and the guy who wrote the books on training for cycling.
Heart rate shows your body’s response to an effort—it can vary based on factors such as sleep, heat, and caffeine intake. Rate of perceived exertion, or RPE, is simply how you feel during a given effort. But your power is your power—it doesn’t matter if you are stressed about that project at work or if it is more than one hundred degrees Fahrenheit outside. 300 watts is 300 watts.
By now, you’ve probably built a solid base of miles through the spring and summer. If you have a big ride coming up this fall—or simply want to get stronger for arguably the best riding season of the year—this story is for you. We’ll explain why power is such a valuable training tool, share our editor’s favorite power meters, and give you a four-week power-based training plan to help you get stronger for your fall rides.
Power as a training tool
First, it’s helpful to understand power. In cycling, power is simply how hard you’re pushing the pedals at any given moment, measured in watts. I was riding with someone recently who prioritizes power so much that he has two data screens on his head unit—power and maps for navigation.
Using power simplifies training and progress. “Measuring power strips out all the other variables to show progress. If your power goes up, you got better,” says Cody Stephenson, the education program manager from Training Peaks.
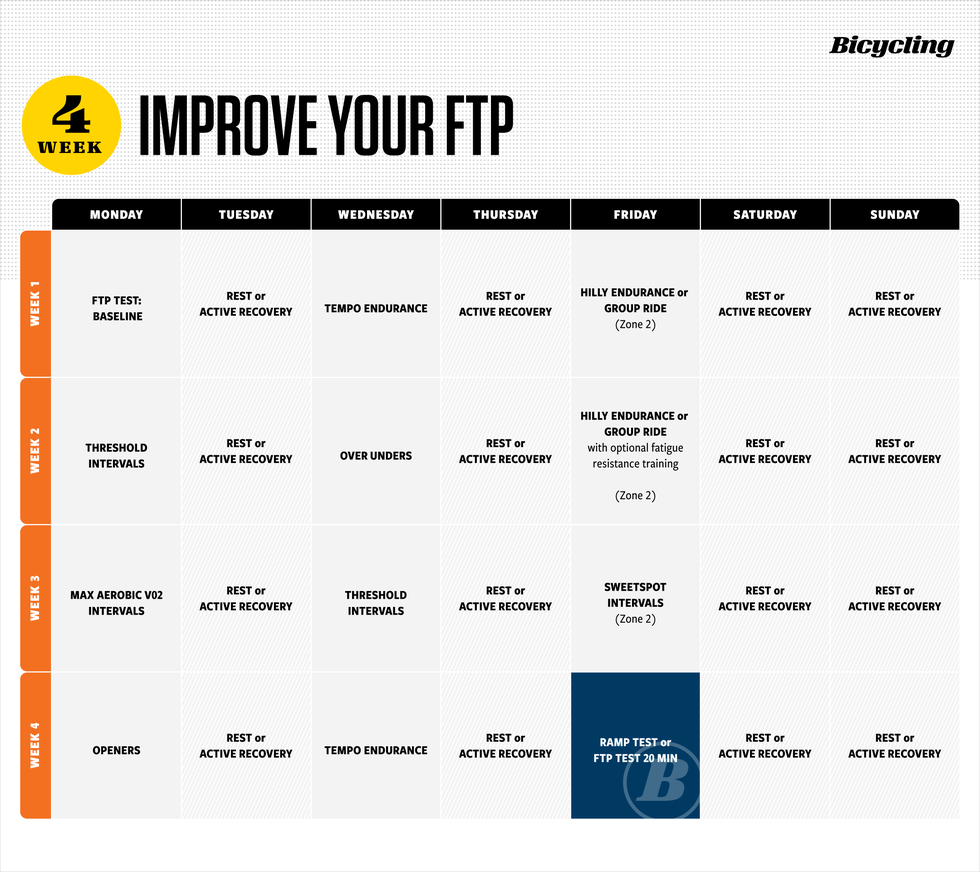
“Power is the purest, simplest measurement of your ability as a cyclist. Assuming other important things like your weight and your aerodynamics stay the same, if your best power for some duration goes up, that means you got better and faster at something,” says Stephenson. This four-week power-focused workout from Training Peaks will get you ready for your upcoming big rides before winter hits.
Keep in mind you’ll need a power meter in order to do this workout outside (if you are on a trainer that shows power that can be used as well). To get some of the best recommendations for power meters, I asked Bicycling’s deputy test editor, Tara Seplavy.
Power meters aren’t cheap, but they are an extremely valuable training tool. Since first riding a crankarm-based Stages model over a decade ago, I’ve had a power meter on almost every road bike I’ve owned or tested.
There are four main types of power meter you can buy: power pedals, crank spider-based, spindle-based, or crankarm. The best choice for you will depend on the bike you ride and your budget.
For many riders, power pedals are the easiest choice. They can be mounted on any bike and can be quickly removed and swapped onto other bikes as needed. This makes power pedals ideal for cyclists with several bikes on a limited budget, as well as riders who travel and rent bikes at their destination. The Favero Assioma Pro RS-2 are our top pick for road riders. Cyclists swapping between road, gravel, or mountain bikes might also like the Garmin Rally pedal combo for use on different clipless cleat types.
If you want to go with a power meter on your crank arm, spindle, or spider, your choice will first depend on your bike’s crank manufacturer. If you own a bike with a SRAM AXS drivetrain, you can upgrade to a spindle-based power meter for as low as $195 (be sure to pick the correct arm length and spindle width to fit your bike).
For riders of Shimano drivetrains, 4iiii’s Precision 3+ crankarm power meters are a trusted choice. The brand offers single-arm and dual-sided models, starting at $335. Another option is to ship your crankset to 4iiii, and it can install one for you (starting at $340). This is also a great choice if you own an older bike or one with a unique crankset (such as Cannondale Hollowgram).
-Tara Seplavy—Deputy Editor for Bicycling
 FTP Test—Start/Baseline
Functional Threshold Power (FTP) is simply the average power you can hold for an hour.
Here are the steps to do an FTP test:
Calibrate your power meterWarm up for 10 to 15 minutesRide at an all-out effort for 5 minutesFollow that by 10 minutes of easy spinningRide at an all-out effort for 20 minutes, aiming for a pace that’s your hardest consistent effort—it should remain steady and not fluctuate. Afterward, ride easy for about 10 minutes to cool down
Then, take the average power of that 20-minute effort and multiply it by 0.95 to get your FTP. For example, if you average 200 watts, your FTP will be 190 watts.
For an even easier option: use your indoor trainer with Zwift. There are multiple options for FTP tests programmed into Zwift, so all you need to do is select the test. I typically suggest riders new to FTP testing hop into the ramp test option for your first one. Once you figure out your FTP, load that into your tracker app of choice—many of them can use this data point to calculate your power zones.
Tempo Endurance
Recently on our Bicycling Show About Bicycling, I talked with Dan Chabanov and Trevor Raab about why riders should typically avoid “the gray zone” of zone three, or tempo. Just as with many other things in training, there is nuance to how different zones get layered into a plan. When used intentionally, tempo can be beneficial to riders—just don’t let your intended zone two rides creep up into zone three. For my tempo endurance rides, I typically will warm up for 10 to 15 minutes, then once I feel warmed up, I will hold that tempo zone for about 40 minutes of steady effort.
Hilly Endurance/Group Ride Zone 2
These rides are meant to be that Goldilocks spot of not too easy and not too hard—look for roughly 50 to 70 percent of your FTP. Remember this is meant to be the average. If you spike on a climb or surge of the group, you did not just blow your zone two ride. Dial it back and be conscious of keeping the power between the lines most of the ride. This ride should be about 2 to 3 hours.
Threshold Intervals
Threshold intervals are designed to get you to spend more time in your zone 4—where you’ll be working to grow your engine for those harder efforts.
Warm up for 10 to 20 minutes with easy spinning in zones 1 to 2Complete 2 to 3 rounds of the following: 10 minutes in zone 4 followed by 5 to 8 minutes in zone 1Cool down for 5 to 15 minutes in zones 1 to 2Five minutes easy spinning Over-Unders
Recently I did a lunch ride up a local climb called Fox Farm Road. It’s a reasonably long climb (for New Jersey) that is like a built-in interval—short but very steep punchy sections interspersed with stretches that are still climbing, but eased off a bit. That back-and-forth between (almost) full effort of zone 5 to recovery in zones 3 and 4 is the goal with over-under intervals. FasCat Coaching founder Frank Overton gave Bicycling this over-under workout:
“This workout is done depending on how long your longest sustained climb near you is,” says Overton. “The one below is based on a 10-minute climb, so you have to adjust to what you have available to you.”
1 minute VO2 max (zone 5)8 minutes at sweet spot (between zone 3 and 4; can lower this based on the length of your climb—if the climb takes 6 minutes, do 5 minutes of sweet spot)30-60 seconds VO2 max (zone 5)5 minutes easy spinning (riding back down the hill or slowly proceeding up if you have a long sustained climb)Max Aerobic VO2 Intervals
This is going to be a day that pushes you close to your limit. Pushing VO2 is a significant effort, but the effort will pay off by the end of the training block. Put the time in now to make some of the climbs easier this fall. Chaz Turmon, a pro rider and coach, previously gave Bicycling this interval meant to push improve VO2 max:
5 to 10-minute warmupThree minutes zone 5Three minutes zone 1Repeat four timesFTP Test—Final Check
I typically recommend doing the same type of FTP test you did in the beginning as your final test. For example, if you did the ramp test as test one, then do the ramp test again after four weeks. This final check doesn’t need to be done, but I like to do this as a follow up to put a number to the progress you’ve made.

As Deputy Editor, Tara Seplavy leads Bicycling’s product test team; after having previously led product development and sourcing for multiple bike brands, run World Championship winning mountain bike teams, wrenched at renowned bicycle shops in Brooklyn, raced everything from criteriums to downhill, and ridden bikes on six different continents (landing herself in hospital emergency rooms in four countries and counting). Based in Easton, Pennsylvania, Tara spends tons of time on the road and trail testing products. A familiar face at cyclocross races, crits, and bike parks in the Mid Atlantic and New England, on weekends she can often be found racing for the New York City-based CRCA/KruisCX team. When not riding a bike, or talking about them, Tara listens to a lot of ska, punk, and emo music, and consumes too much social media.

Jason Griffin is Bicycling’s Senior Health and Fitness Editor, bringing more than a decade of fitness experience and years in the cycling industry to every story. A former personal trainer and bike shop manager, he’s lined up for crits, tackled enduros, but prefers getting lost on multi-day bikepacking adventures. Lately though, his toughest balancing act has been fitting trainer rides between family life and the next adventure.