IT classrooms are equipped with state-of-the-art projection systems offering audio and video capabilities to support teaching and learning. Teaching with technology can engage students at all levels and enhance their learning experience in and out of the classroom. The following resources provide helpful guides on how to effectively utilize the technology integrated into these classrooms.
General IT classrooms are equipped with wired and wireless projection as well as document cameras, and speakers. Many classrooms are also equipped with microphones, video cameras, and Echo360 for lecture capture.
For help, call CITS: 508-999-8900, option #2.
(Wired) Projection
All classroom projectors use HDMI inputs. All university-owned computers include the necessary adapter cable to connect to the projector.
To connect your laptop to the projector:
On the podium or instructor table, plug the yellow label HDMI cable into the laptop.
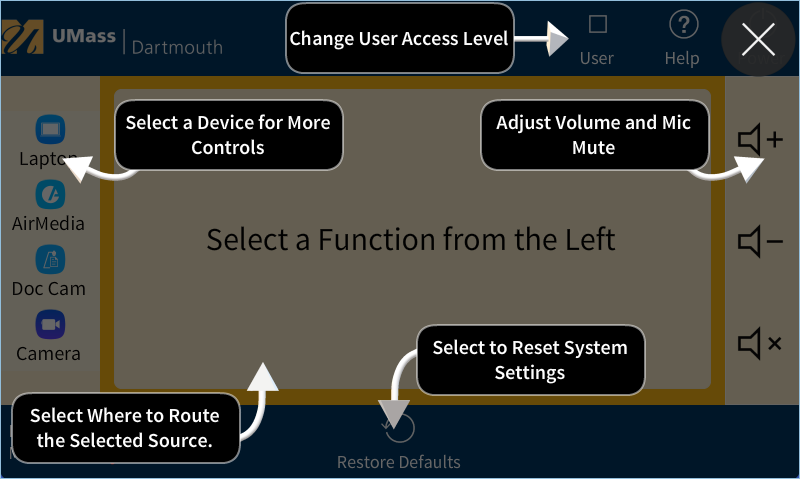
On the podium or on the wall nearby, tap the touch panel to begin
Select “laptop” from the left side of the touch panel
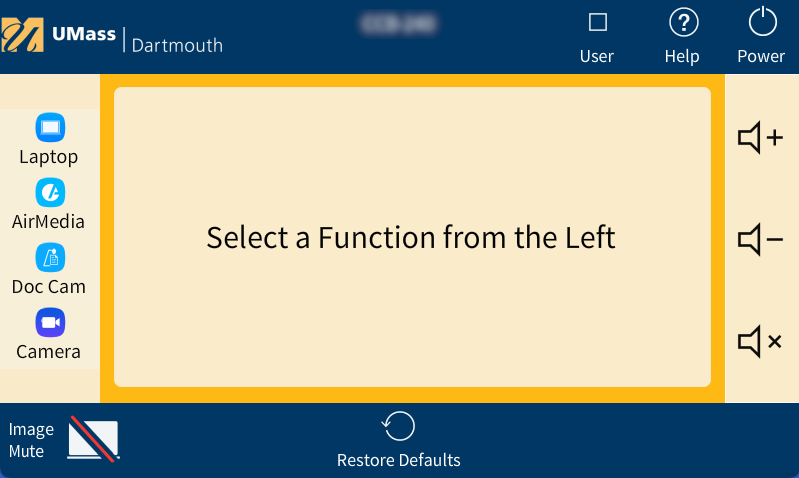
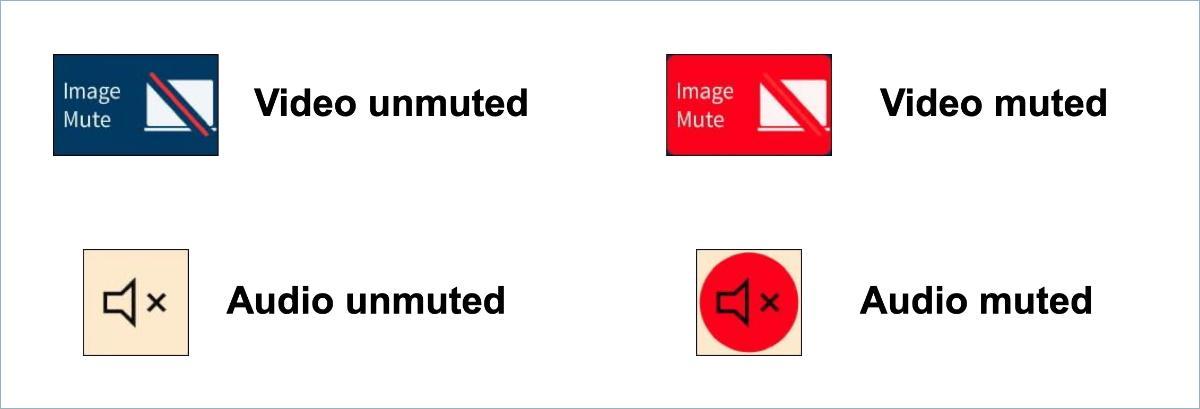
Touch Panel Controls: Video and Audio Mute
Use the image mute button to temporarily turn off the display on the projector
Use the audio speaker button to adjust or mute room audio
(Wireless) Projection with AirMedia
Most classroom projectors have wireless technology that allows you to use them without a wired connection. Install the AirMedia application on your computer, select AirMedia on the Crestron panel, and follow the on-screen instructions to project your laptop display wirelessly.
Instructions for Win/Mac coming soon!
Document Camera
The document camera is used with the projector to display printed and handwritten materials. The document camera has a blue-label HDMI cable that connects it to the projection system.
To use the document camera with the projector:
Press anywhere on the touch panel to begin
On the touch panel, select “Doc Cam” as the input.
Speakers
Classroom speakers broadcast the audio that is shared from your computer.
To use classroom audio:
Set your computer volume level to 60-80%, then connect your computer to the projection system (wired or wireless)
On the touch panel, use the volume control to make further adjustments.
Some large lecture halls are equipped with voice amplification.
Echo360
Echo360 is used to stream and capture audio and video of the instructor, as well as the output of the projector.
For more information, including requesting lecture capture recordings for your classes, please visit the Echo360 website.
Classroom Technology Common Troubleshooting Tips
Projection: Yellow Label HDMI Cable – make sure the HDMI cable connected to your laptop has a yellow label on it. The HDMI cable with a blue label is for the document camera.
Touch Panel: No Inputs to Select – click on the Help button in the upper right of the touch panel, then tap anywhere on the panel to refresh the list.
No Room Sound: – Check your computer system volume settings and the specific program sound levels (i.e., YouTube video volume). On the touch panel, check that “audio mute” is not selected, which would block computer sound with the projection system.
Touch Panel Help: Use the help button on the touch panel for additional help in using the Creston touch panel