
I set out to photograph and light paint a collapsing market in Desert Center, California. Here’s how I pulled it off. I’ll take you behind the scenes of my desert ghost town night photography safari.
There were some issues with attempting to photograph this abandoned market with a collapsing roof in a hot, dusty desert ghost town. I did the entire photo in a single exposure, however. This was despite contending with lights from nearby interfering with my light painting, hot weather combined with high humidity, and so much more.
But first, let’s find out what “light painting” is.
What on Earth Is ‘Light Painting’ in Night Photography?
“Light painting” is often used loosely to describe adding any kind of light to a scene. But technically, it’s using a handheld light source to “paint” during a long exposure. Your flashlight is the brush, the scene is your canvas, and you decide what gets lit and what disappears into shadow. Night photographers have used this technique for decades.
Why do I love handheld light painting? Because it’s fast, flexible, creative, and ridiculously fun. No need for light stands, no heavy gear—it’s just you and your light shaping the scene.
The amazing secret here is the ability to turn invisible! Keep moving, and you won’t show up in your long exposure photo. Incredible, eh? If you stand still for about ten percent of the total exposure, you begin “registering” in the photo. So yes, just keep moving! And block that light from shining in the camera (or on you).
I use a ProtoMachines LED2, which is unfortunately discontinued. We are hoping that ProtoMachines releases new products. You may also use other LED flashlights, such as the Wurkkos FC11C, which has a pleasing warm white light (but not any other colors).
The Road That Wasn’t
This shoot didn’t even start in Desert Center. I’d planned to photograph an abandoned lime mining outpost way out in nowhere—16 miles from the nearest paved road. But at the last second, I switched routes. Wrong choice. The road was closed.
A while back, I had passed the turnoff for Desert Center, California. The town was founded in 1921 by Stephen Albert Ragsdale, also known as “Desert Steve,” and his wife, Lydia. They advertised in Desert Magazine, “Our Main Street is 100 miles long!” My favorite of his ads was, “We lost our keys…we can’t close!” This was referencing the fact that the café had been open 24 hours a day, 365 days a year since it opened in 1921.
I had been meaning to photograph here for years. Desert Center it was.
There was, however, one issue: Desert Center would be quite a few degrees hotter than my original destination.
Hot, Hot, Hotter…
Sure, the desert is hot. We all know that. But this was hot and humid. The second I stepped out of the car—just before sunset—I was drenched. It was 100 °F (38 °C) with 60% humidity. I had plenty of water, but I knew this was going to be rough.
But Wait, There’s More!
As if being hot weren’t enough, I texted one of my friends that I had a change of plan and was photographing Desert Center. He texted back, discussing his experience with photographing in the middle of town:
Three of us went down there and got harassed one time. A guy showed up with a shotgun rack in a pickup truck and started hassling us.
Two of us went back a year or two later, and we didn’t have a problem, but we limited our time to the gas station.
I had just come from the gas station and was headed straight for the, well, center of Desert Center.
Photographing the gas station at night at Desert Center, CA.
Photographing the Town
The post office had its lights on. There were other lights coming from a trailer park nearby, its sodium vapor lights spreading their hideous orange light onto the café and other buildings nearby. Sodium vapor lights are the bane of night photographers, along with cheesed-off birds and bats, copper thieves, annoyed security guards in white base-level trucks, and squatters.
I decided that I would keep the car very close to me. I moved it several times as I moved from building to building, photographing. Less walking, less sweating, and the ability for a quick getaway.
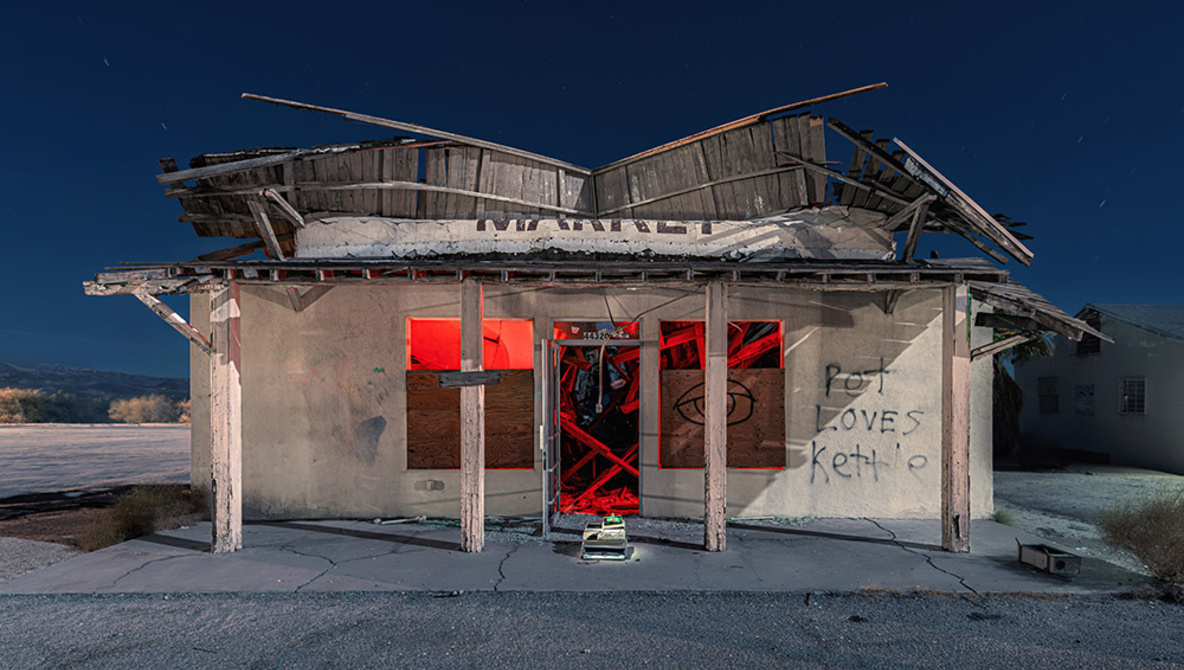
Photographing the Abandoned Desert Center Market
The unique building, with half of the sign missing and its caved-in roof, closed around 2008. Given its unique features, I felt it would make an interesting subject. A bonus is that it wasn’t completely bathed in orange light, unlike the café and the building to the left of it.
To my surprise, there was an adding machine right outside the door. This would add a bit more of a focal point to the composition.
Four Steps for Light Painting the Market
Light painting is sort of like being a film producer. You decide what is illuminated and what remains in shadow. Therefore, light painting is not a random activity, simply spraying light on a subject to light it up and nothing more. There is composition, shadows, detail, and more to consider.
Step 1: Lighting Up the Adding Machine in Front of the Door
I attached a snoot, an eight-inch tube that attaches to my light and serves as a light modifier. I wanted to direct the light at the adding machine only, and this was the easiest way to do it. I held the light directly over the adding machine and gave it a quick pop of light, just for a second. Since the adding machine was white and reflective, it didn’t need much light.
Step 2: Illuminating the Exterior
Using a warm white light, I illuminated the exterior from the left and right sides of the market. This created some detail, particularly on the four posts. The lights from the post office to the right were bright, and I wasn’t going to overpower that. But a little bit of warm white light from a sharp angle created some detail.
Step 3: Decisions About the Light for the Interior
The first time I light painted the interior, I used a warm white light. It had worked with the gas station. However, here it didn’t offer enough contrasting elements. I decided to use a red light instead, and that seemed to work. This helped create additional interest. I don’t always use colors other than white for my light painting. If I do, I like it to add interest, set a mood, or create intrigue.
Step 4: Skimming the Light off the Roof and the Sign
The broken sign and collapsing roof were interesting features. I stood back and to the side and directed the light to illuminate these features, then ran to the other side to do the same.
How I Remained Invisible for my Light Painting
We learned above that we have to keep moving so we don’t show up in the photo. Without going inside the building, I stuck my light in back of the plywood on each of the windows, then kept both my body and my arm moving back and forth. It is important to be mindful of this technique when illuminating things from windows so you don’t show up in the photo.
Apart from that, I just walked from one place to another, continually moving.
All Done!
By 10 p.m., I’d drained a gallon and a half of cold water and was down to my last gallon, now warm and unappealing. After only two hours of photographing in 100-degree humidity, I was soaked and done. And I had not been accosted by anyone in trucks with shotgun racks. It felt like a good time to call it a night.
Visiting Desert Center
Desert Center is just off I-10 in California, about halfway between Los Angeles and Phoenix. It’s very accessible. But while it may be an almost-ghost town, there are still a handful of residents. If you visit, be respectful. Be quiet. And if you show up to photograph at night, keep your car nearby—you’ll appreciate a quick getaway from the heat… or anything else.
Can’t Get Enough of Night Photography in the Southwest?
If you wish to learn more about night photography, light painting, star trails, Milky Way photography, or related items and wish to photograph in Southwest ghost towns, deserts, and mountains, I do teach night photography workshops with Tim Little several times a year.