

If you missed last night’s display, it looks like we could be in for another show tonight. This fall is solar maximum—the peak of the sun’s 11-year cycle of activity—so displays are both more intense, and more likely across the next few months too. Based on me and my wife’s experience chasing the lights across the U.S. and Canada, here’s how to maximize your chances of seeing them, without setting yourself up for disappointment.
It was after we’d trapped ourselves on a sweltering bus full of Korean tourists for over an hour, winding our way through a boreal forest in Canada’s Northern Territories, then dropped over a 100 degrees as we stepped off onto the shores of a frozen lake that the Japanese tour guide finally spoke to us in English. His simple instruction was: “The best way to see the lights is through your phone.”
During weaker displays and below the 49th parallel, it’s most common for the human eye to perceive the northern lights as something akin to a faintly illuminated “fog” in the sky.

Wes Siler on Instagram: “The northern lights from hunting camp.…
Check out this picture for instance. That was a three second exposure on my Pixel 8 Pro. To the naked eye, all that was visible was a faint glow without any color to it whatsoever.

Wes Siler on Instagram: “Some bad phone photos of last night’s …
That’s not to say this is always the case. During the May, 2024 event, the colors and intensity you can see in the above photo were just as good to stare at as they were to photograph. The Kp index that night hit 9, the highest possible intensity.

Wes Siler on Instagram: “Helluva nice day to live in Montana w/…
The highest number I saw last night was 8.33. The lights were clearly visible even from our backyard in downtown Bozeman, Montana, through all the light pollution created by the new LED street lamps in front of our house. This picture captured with a three second exposure on my Pixel 10 Pro XL was representative of what I could see with my naked eye.
My best piece of advice? Don’t spend thousands flying to northern Canada just to allow yourself to be kidnapped by an all-night package tour designed for tourists from Asia. The lights we saw that night paled in comparison to the ones we saw from our AirBnB’s balcony a few nights later (pictured below). And that night with board games and a home cooked meal in a warm apartment was a lot nicer than the one we spent standing around in -20 temperatures, unable to leave, or even pour ourselves a glass of wine.

Wes Siler on Instagram: “We went all the way to Yellowknife, an…
By all means put in the effort to walk to a local park—as Virginia and I did last night. Drive into the mountains if those are nearby. But also realize that the lights are both fleeting, and hard to forecast. Predicate your plans on the likely eventually that you might get skunked. Don’t forget that cloud cover can completely block your views.
But if the lights do make an appearance, you’ll want to be able to enjoy them. Dress warm, take something to sit on, bring a blanket and plan to spend a few hours relaxing outdoors in the dark. A thermos full of warm drinks, a bowl full of snacks, and anything else you can prepare ahead of time so you can eliminate the need to turn on a flashlight will be a welcome comfort. On that same note: go ahead and eat dinner before you head out.
If you want to nerd out on data, then the northern lights can very much be an opportunity to do that. But for the rest of us, here’s a basic primer on equipping yourself with all the information you need.
The aurora are caused by particles from the sun interacting with our atmosphere. Those particles are ejected from the sun during solar storms. So, armed with a telescope, astronomers can see those storms occurring, and from there give us one to three day’s warning that they might create lights. From there, satellites can add about a 30 minute heads up, and then we have earth-based observation. All that’s to say: there’s no sure way to forecast the appearance of lights until you can actually see them.
Since all the numbers involved make my head hurt, I like to keep things simple, and use the Aurora app for both near term forecasts, and real time alerts that the lights might be active. That gives you the ability to track the Kp index, and follow a visual map of intensity as the lights pivot around the magnetic pole. Make sure you enable the apps alerts.
The Kp index is a global measurement of how much Earth’s magnetic field is being disturbed by charged particles ejected by the sun. It runs on a scale of 0-9, and can be used to determine both the strength and spread of the lights.
On the above map, you can see where aurora might be visible to the human eye overhead at a given Kp index value. The lights can be visible from further south than these lines, but will be low on the northern horizon.
The My Aurora Forecast app provides both current and near-term forecasts for the Kp index. Keeping an eye on those numbers, and on the visualized map of observed aurora activity is the best way to predict the lights.
The other big factors are light pollution and cloud cover. There’s a bunch of tools, but I use the Light Pollution Map for its simplicity. During weak displays, the lights won’t be visible in areas full of street lamps and other light sources. Even as the Kp index approaches 9, you’ll be able to best observe lights away from artificial light.
And while the Aurora app provides some cloud cover data, I don’t find it to be all that accurate. Instead, I turn to my usual weather forecast app, Weather Underground, and toggle on the infrared satellite layer in the map.
For an ideal aurora viewing location, you want minimal light pollution, clear views of the northern horizon, and clear skies. When in doubt, go high. Hills, mountains, rooftops, and similar will move you above objects and lights that obscure the northern horizon.
As should be obvious, I am an absolutely terrible photographer. If you’re actually good at taking photos, seek out guidance from a professional. For the rest of us, here’s some basic tips:
Your phone’s camera is one of the best possible devices for observing and photographing the northern lights.
In your camera app of choice, toggle on the night setting.
If you feel like taking manual control of exposure times, that can be helpful. Start with three to four seconds, take a shot, see how it looks, then go up or down based on how blurry it is.
Don’t bother with very long exposures, the lights move, as do stars and clouds. 10 seconds is probably the absolute max.
With longer exposures, your photos will benefit from stability. You can use a tripod, a phone stand, or do what I do, and just grab a rock, a boot, or use your truck as a stand. Prop your phone up facing the desired direction and elevation so that you can still reach the shutter button on the screen.
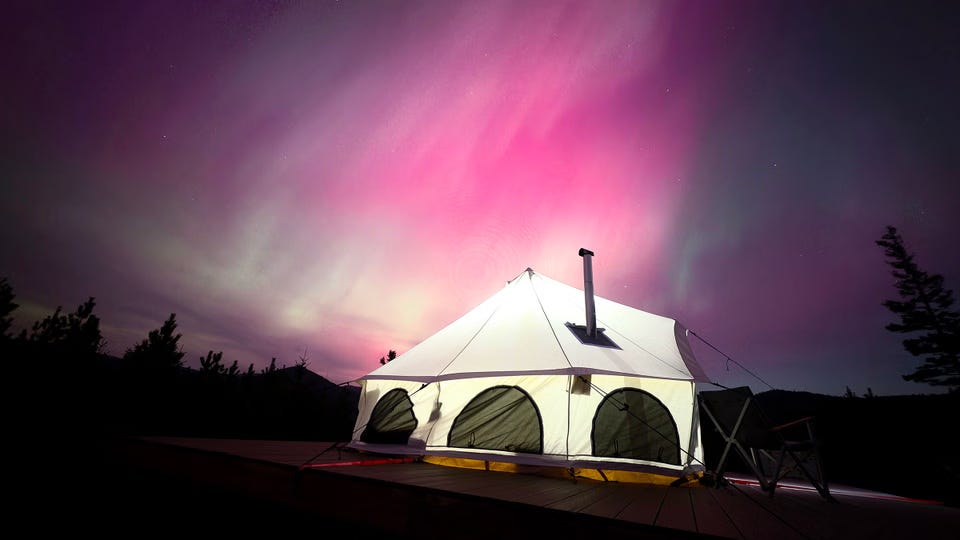
Compose your shots with trees, tents, vehicles, people, mountains or similar in the foreground.
Want to save money on outdoors gear, while buying the most effective stuff? Upgrading to a paid subscription is an investment in the future of independent journalism around the outdoors, and buys personal access to Wes, who will guide your individual purchases for apparel, tools, vehicles, and more. You can read more about that value proposition at this link.