
The Wallabies have survived a scare to start their Spring Tour, holding on for a hard-fought 19-15 win over Eddie Jones’ Brave Blossoms at Tokyo’s National Stadium.
New captain Nick Champion de Crespigny scored the first try of the afternoon in the 12th minute from a pick and drive. Josh Flook scored the only other try of the first term.
Japan outscored Australia two tries to one during the second half, making it a four-point game with 20 minutes to play. The Wallabies’ defence and the Brave Blossoms’ inaccuracies were the difference in the end.
Here’s how the Wallabies rated.
 Match Summary
1. Angus Bell – 7
This match marked the start of the Wallabies’ new era without the team’s all-time appearance record-holder, James Slipper. Angus Bell replaced ‘Slips’ in the Wallabies’ run-on side, starting at loosehead prop for the first time in 2025.
Bell finished with the most carries out of any player, fighting for every single metre opposite a strong Brave Blossoms defensive line. The 25-year-old is already considered ‘world-class’ by many, and there were shades of that in this performance.
2. Josh Nasser – 5
Josh Nasser’s first lineout throw failed to hit the mark, sailing above the hands of the intended target before Japan turned over possession. Nasser was perfect at the set-piece for the rest of the half, with Josh Canham one of the two targets.
Nasser linked up well with Angus Bell and Zane Nonggorr before the hooker was replaced, with a steady Wallabies scrum one of the takeaways. At half-time, Nasser stood alongside Nick Champion de Crespigny and Carlo Tizzano with the equal-most tackles for a Wallaby.
3. Zane Nonggorr – 4
Zane Nonggorr hadn’t started a match for the Wallabies before, but Joe Schmidt gave the young tighthead an opportunity against the Brave Blossoms. Nonggorr was good at the set-piece but was otherwise fairly quiet, carrying the ball twice and making one tackle in the first half.
4. Jeremy Williams – 7
After a bit of an injury crisis at lock – with Lukhan Salakaia-Loto and Josh Canham both walking off the field injured – Jeremy Williams stepped up. Whether it was around the park or at the set-piece, Williams’ efforts deserve some praise.
When the Wallabies needed someone to step up, Williams was the go-to lineout option for Billy Pollard. Williams took the ball to ground as the Wallabies set up for a rolling maul, leading to Carlo Tizzano’s important try. But that’s just one moment to speak of from a generally sound performance from the Western Force skipper.
5. Lukhan Salakaia-Loto – N/A
Lukhan Salakaia-Loto was replaced in the seventh minute after picking up an injury. Salakaia-Loto received some medical attention before playing another couple of minutes, having registered one line break from a single carry.
6. Nick Champion de Crespigny (c) – 7.5
Nick Champion de Crespigny enjoyed a dream start to life as a Wallabies captain, powering over from a pick and drive to score the first try of the contest in the 12th minute. After injuries to Lukhan Salakaia-Loto and Josh Canham, the skipper shifted into the second row.
Champion de Crespigny was especially prolific on the defensive side of the ball, right up there with Carlo Tizzano as the Wallabies’ leader for total stops. It would be a surprise not to see Champion de Crespigny feature in one of the next four Tests, likely off the bench.
7. Carlo Tizzano – 8
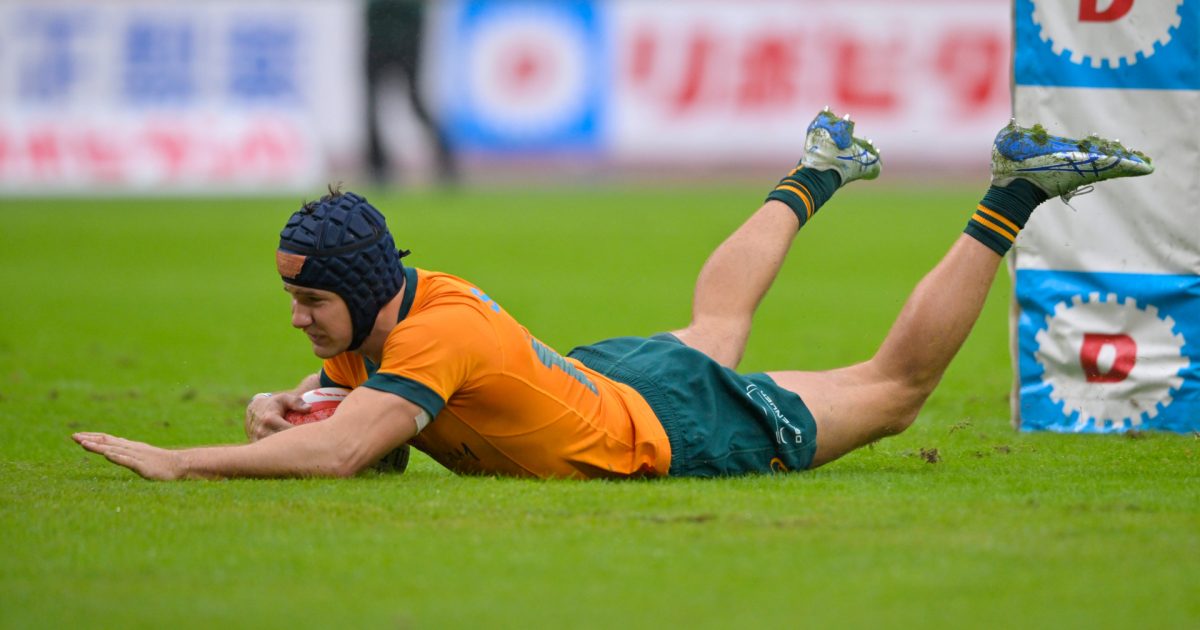
It was impossible not to notice Carlo Tizzano during the opening 40, with the flanker seizing the chance to chance to start. Tizzano came incredibly close to scoring twice, having been held up once, before a third attempt was ruled out by the TMO for obstruction. But the openside finally scored midway through the second half, crashing over from a rolling maul.
Tizzano secured a turnover just before the half-time break – a fitting end to the half for the loose forward, who as always was a workhorse on both sides of the ball. Having finished among the Wallabies’ leaders for tackles and carries, it’s hard to fault Tizzano’s performance too much.
8. Rob Valetini – 7
Wallabies fans will be pleased to see Rob Valetini play the full 80 minutes, which the backrower hadn’t done since September 13 against Los Pumas. Valetini reached double digits for carries but the No. 8 wasn’t as impactful on the defensive of the ball. There’s still plenty of confidence to take out of this Test for Valetini ahead of the team’s final four Tests of 2025.
9. Jake Gordon – 7
This was another step in the right direction for Jake Gordon, who returned from injury against the All Blacks earlier this month. Gordon kicked well from the base of the ruck and provided quick ball with his passing game. The No. 9 was better against Japan than he was against the All Blacks, and that bodes well ahead of other Spring Tour Tests.
10. Tane Edmed – 4
Handed the playmaking reins for the third time as the Wallabies’ starting fly-half, Tane Edmed was solid to start the match, but was far too quiet during the second term. Edmed helped set up Josh Flook for a try in the 30th minute, linking up with other backs on a clinical set-piece play.
But it was a game of two halves, really. Edmed struggled to make a difference during the second term, with the Brave Blossoms playing with a wealth of confidence. Edmed needs to lift for some big matches ahead during the Spring Tour.
11. Dylan Pietsch – 6
After a long stint on the sidelines with a jaw injury, Dylan Pietsch returned from injury, starting on the left wing. Pietsch worked hard in an effort to get involved, carrying the ball eight times during the Test. But as the Brave Blossoms grew in confidence, the winger was played out of the match at times.
12. Hunter Paisami – 6
Hunter Paisami had some good moments on both sides of the ball, finishing as one of the team’s leaders for both carries and tackles completed. Paisami played a part in Josh Flook’s try around the 30-minute mark, in what was a highlight from the inside centre’s match. But the Queensland Reds midfielder went missing for long periods, slipping off some tackles too.
13. Josh Flook – 6
Finished off a superb piece of play from the Wallabies backline, with about four players touching the ball off a scrum before Josh Flook was sent flying through open pastures, all the way to the house for the team’s second try of the afternoon. Flook was right up there as one of the game-leaders for metres with 10 to play. The centre made a decent number of tackles too, but like some teammates, was fairly quiet overall.
14. Corey Toole – 4
Corey Toole’s first memorable involvement in this match was an attempted clearance in the 26th minute, with the Paris Olympian shanking the kick, which sailed a couple metres beyond Australia’s 22 metre line. Toole got the ball a few times early in the second half, but the Brave Blossoms did a good job at shutting the winger down.
15. Andrew Kellaway – 4
After missing both Bledisloe Cup matches against the All Blacks, Andrew Kellaway returned for this Test at fullback. Kellaway threw a superb pass to Josh Flook around the 30-minute mark, with the centre racing away for the Wallabies’ second try of the afternoon.
Aside from that try assist, Kellaway couldn’t quite get into this match for long periods, especially when the Brave Blossoms clawed their way back into the contest during the second term. It wasn’t all doom and gloom, but it wasn’t all sunshine and rainbows either.
Replacements
Billy Pollard – 6 Aidan Ross – 6 – Joined rare company by becoming just the fifth person to play for both the All Blacks and Wallabies. Tom Robertson – N/A Josh Canham – N/A – After coming on as an early replacement for Lukhan Salakaia-Loto, Josh Canham played about 15 minutes before leaving the contest following a collision with Brave Blossoms skipper Warner Dearns. Harry Wilson – 7.5 Ryan Lonergan – N/A Hamish Stewart – 6 Filipo Daugunu – 6