

Most photographers start with a subject or theme. Conceptual photographers start with a question. What does isolation feel like? Not, “Where can I shoot next?” Entering the world of conceptual photography is a beast of its own. It comes with its own challenges and rewards. My biggest question was, how do I start?
The strongest photographs begin with ideas, not scenes. Think of the idea as the lead actor. Emotion and meaning are designed first, with settings, lighting, and gear as the supporting actors of the concept. Conceptual photography can push your boundaries and creative limits as a photographer and, at the same time, make you better — technically and creatively. Conceptual photography presents challenges, primarily of an innovative nature. All projects need to start with a solid foundation, and you must be willing to let the project unfold and the path evolve.
In late 2024, I began experiencing a creative funk, and I knew I needed to take action to get out of it. I embarked on a year-long photo project. I wanted a challenge and something to push my creative boundaries. I started with several ideas, including some from a concept I had developed several years ago, as well as a few new ones. How did I decide on which project? It took some time, but I narrowed it down to these few key points.
Time: I had an entire year to complete the project, but I am known for doing things a little over the top. I knew it had to be something personal that wouldn’t require a significant amount of time, as any project would take considerable time, there was a deadline, and it needed to be something I was motivated to create.
Logistics: A few earlier projects were going to be a nightmare, logistically. I planned these projects solely around logistics, as this is a standard part of any project. I asked myself, “Can I do this alone, or do I need help?” Additionally, I had to consider locations and determine if this was something I could accomplish locally.
Unique: I had to ask myself, has this been done already? Now, if your project is similar to another project, I would not scrap it. You are you, and adding your touch makes it a whole different project.
Achievable: The other thing I needed to think about was whether the project was feasible. Can this be completed on time? One project in my notebook was achievable, but only if others participated, which I did not want to rely on.
Photographer Friends: Well, I should say friend. I met almost weekly with a former coworker and great photographer friend for a few months, bouncing ideas for a few projects. After discussions, I decided on my year-long project. From there, we met and discussed ideas further. I gained insight I had not considered. Make sure you talk to other like-minded photographers. They can be of great help!
Step One: Start with Emotion
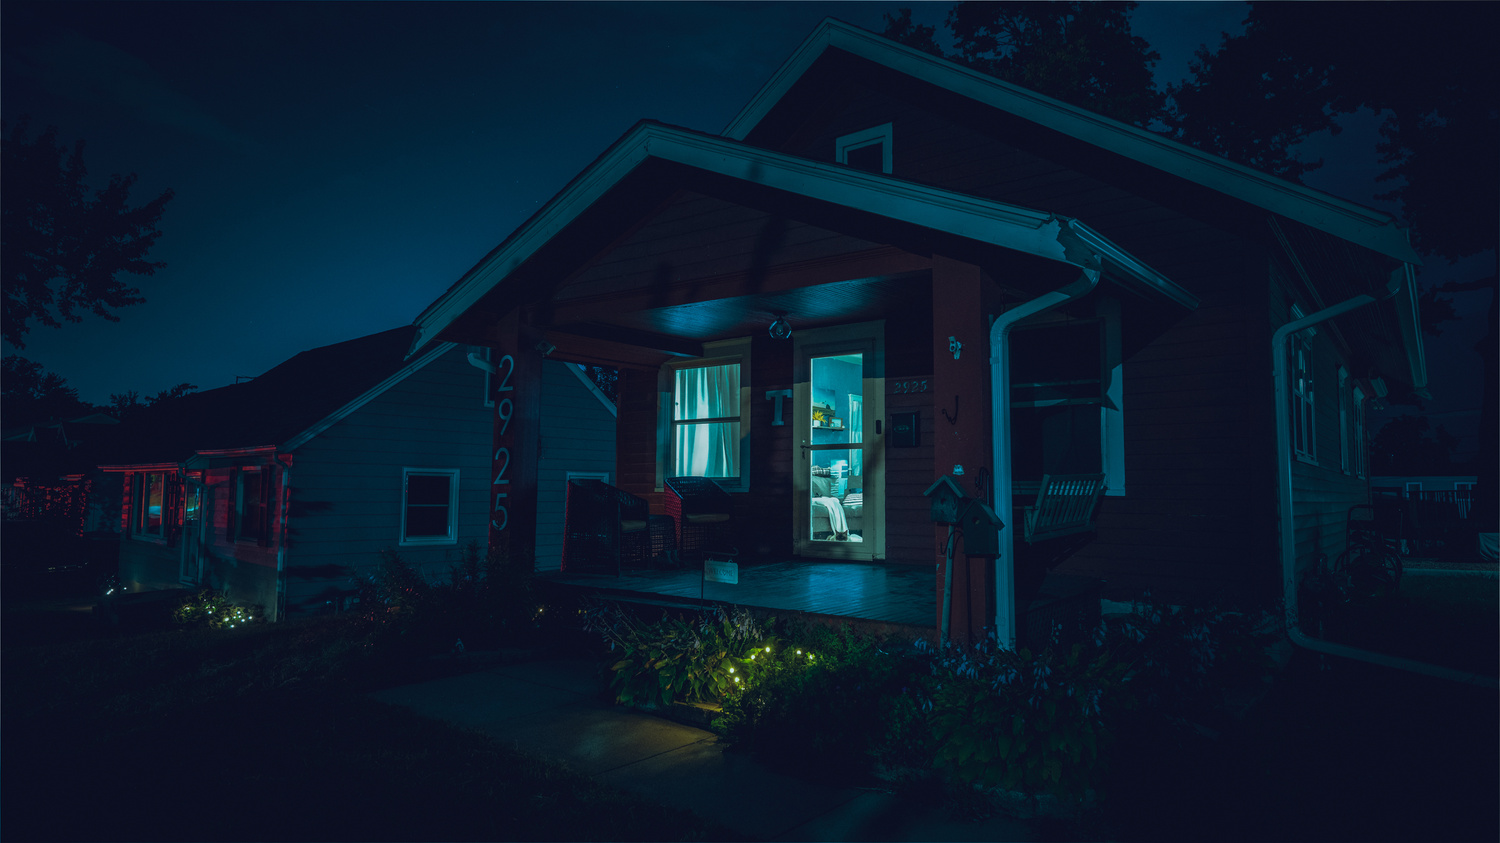
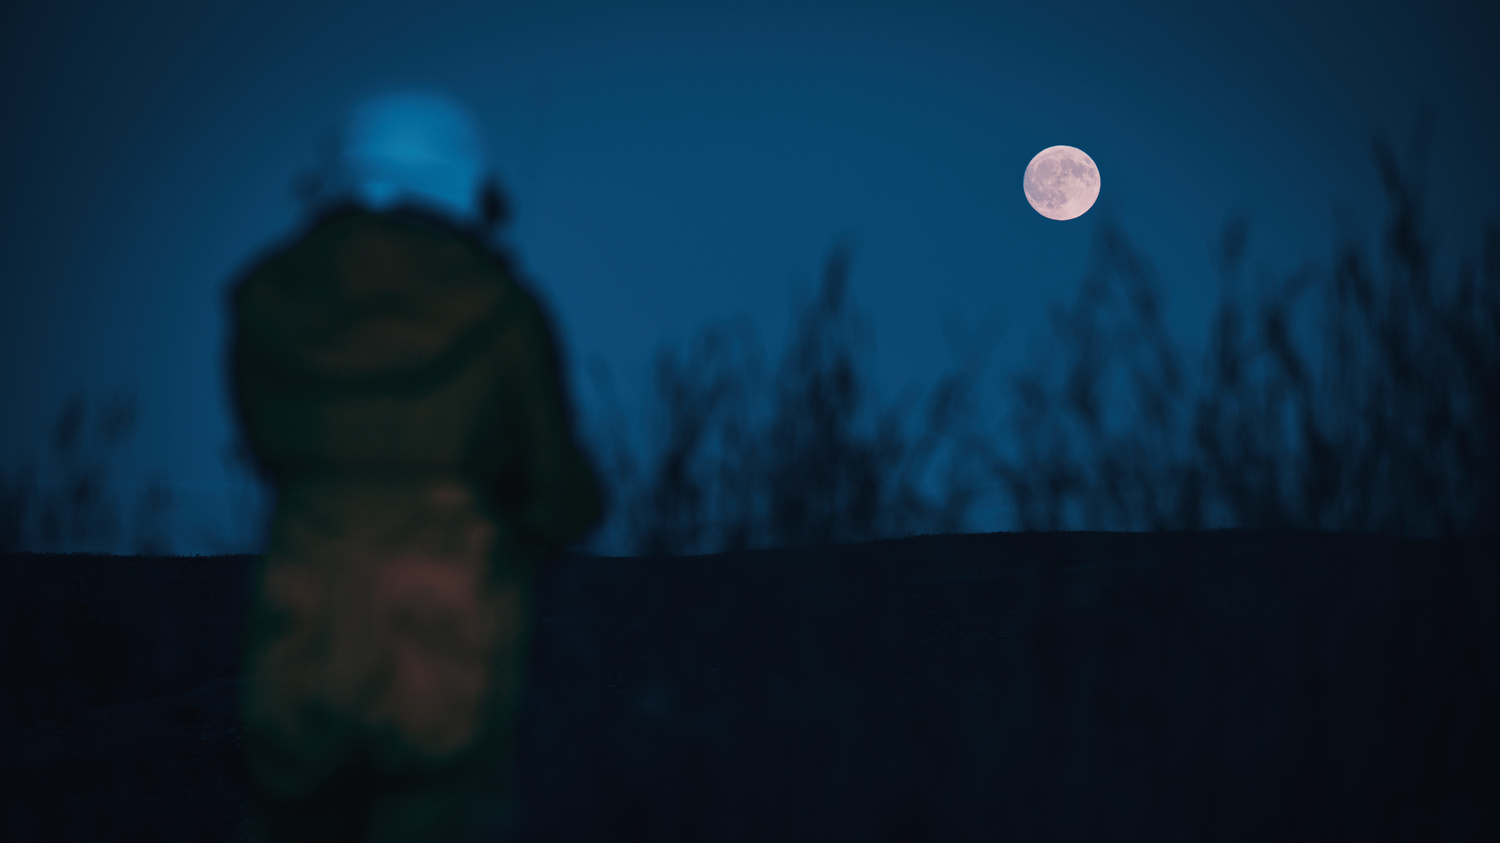
The foundation of a project can really first be set with emotion. Start by asking, How do I want the viewer to feel? Is it truly a photograph if the viewer feels nothing? A good place to start is by sitting down and building an emotional foundation. Begin by considering how you want the viewer to feel. Is it loneliness, excitement, loss, or nostalgia? Journal words down in a notebook that can describe your project. Emotion will drive many future decisions as the project progresses, including color, composition, lighting, and more. My project, Lost in Orbit, began with the word “isolation,” and everything grew from there.
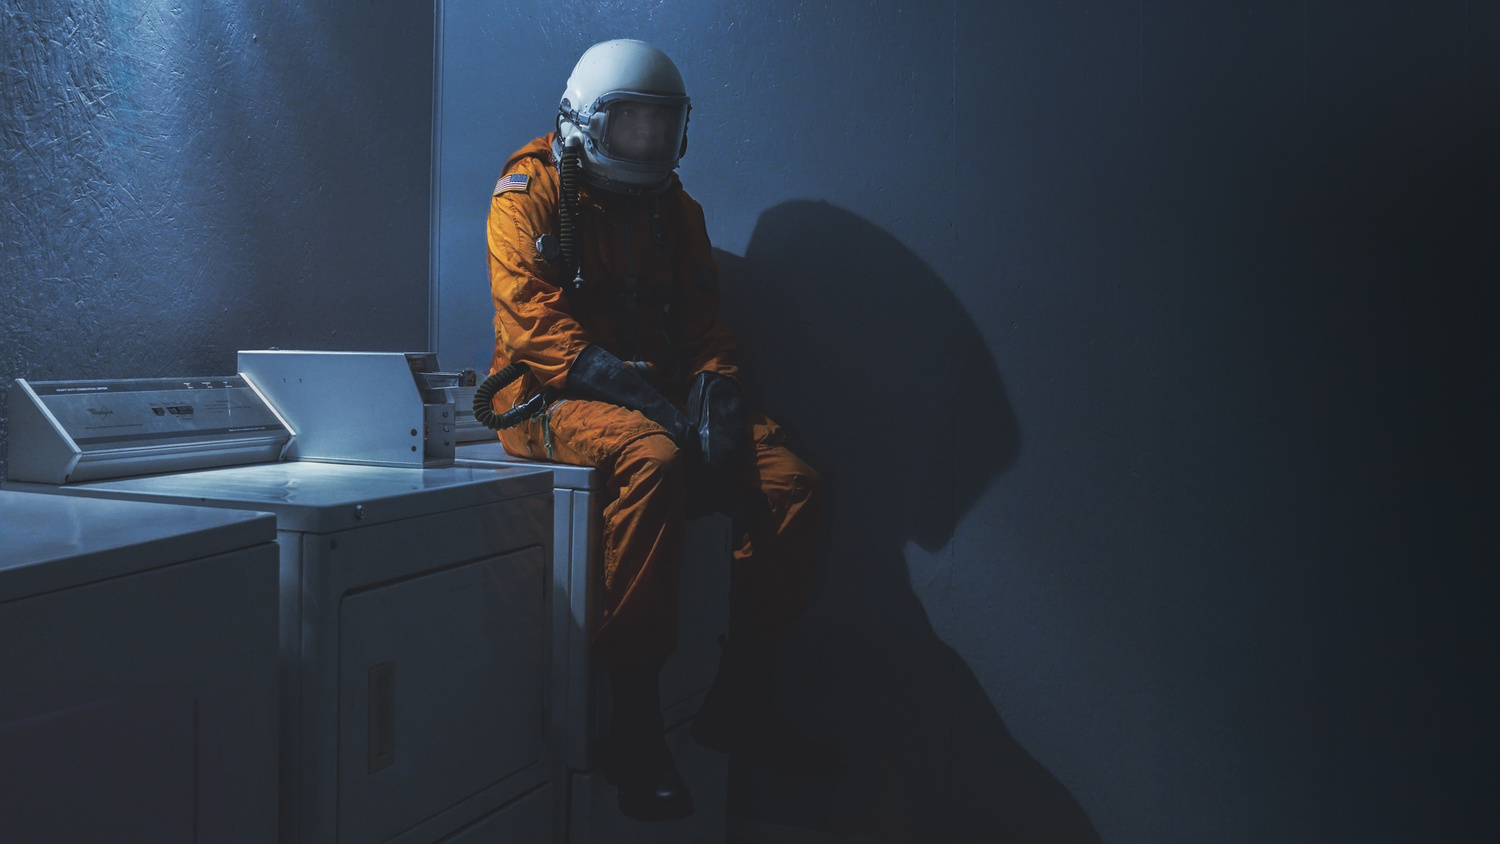
Within this step, you aim to take an abstract concept and create a tangible image. This is one of the more challenging aspects of conceptual photography to achieve. At this point, you can start brainstorming ideas and things that have meaning. These can be environments, objects, or symbols that carry meaning. For Lost in Orbit, isolation was the first word I started with. I then began to find words that described my feelings. From these words, I started building the concepts around them. You can subtly convey meaning in the photograph without forcing it upon the viewer, allowing them to interpret the image in their own way.

Step Three: Build a Symbolic Framework
Consistency is essential in any project. There are many ways to achieve consistency—through color, lighting, props, or environment. One of the best ways to achieve consistency is through toning of the images or a prop. Using color can subtly introduce a mood or feeling to the viewer. Cool colors can represent calm or isolation, while warmer colors can show hope or safety. Light also plays a key role. Harsh lighting can convey chaos or struggle to the viewer, while softer light can evoke calm or peace. Combining color and lighting can effectively communicate a mood or theme in a project. Consistency can change throughout the project as you travel through the images. You can start with a specific tone and gradually work to a different one. When it comes to props, you can have the same prop in every image throughout the series that represents a subtle meaning as well. Maintaining consistency throughout your project enables viewers to become familiar with your language.

Step Four: Design the Visual Structure
Now we are at the point where we take our concept and start to build the visual narrative. This is where I begin to storyboard the project’s progression. For Lost in Orbit, I had pages and pages of ideas on how I would tell the story. I had written all these down as the ideas came to me. I started by organizing similar ideas into their own categories. From here, I started storyboarding the visual narrative. You need to remember that your narrative will evolve as you work through the project, and that is okay. Flexibility is key when creating any project.

Step Five: Previzualize the Light
Once you have a rough draft of your visual structure, it’s time to start considering the lighting. This is where you can begin connecting your lighting decisions directly to the emotions within the series of images. For myself, I examined the images individually and found ways to represent the story through lighting and color. At this point, I was also thinking about the overall bigger picture and what toning I would carry throughout the concept. These are the questions I asked myself during this stage of the planning process.
What am I trying to say?
What colors can I use to represent the emotions?
What choices do I need to make for exposure?
How am I going to light these images?
Once I had answered these questions, I began building my storyboard. I used Milanote for this portion of the planning process. If you are not familiar with Milanote, it is an app or online platform that serves as a visual collaboration tool for creative projects, allowing users to organize notes, images, links, and files into flexible digital boards. It facilitates brainstorming, planning, and task organization through a drag-and-drop interface. This was a great tool to use, as I could drag and drop ideas while rearranging them to find the order that I wanted to achieve. I also used it to add photos that I found for inspiration and visualization. These were key during the phase where I started thinking about natural and artificial lighting. Remember to reference the emotion, color, and lighting diagram for each photo during the design process of your lighting diagrams and storyboard. This keeps you organized and on track. Each technical decision should reflect and reinforce the emotional DNA of your concept.

Step Six: Execute With Intent, Not Impulse
You are now at the point where you are tying creative control to storytelling. When you start creating your images, you are no longer searching; you are translating. You’re taking the abstract concept and turning it into images. Even though you have made your storyboard, lighting, and exposure decisions, ensure that you still allow for improvisation, but keep it central to the concept. Many times, I strayed from the original storyboard. Many times, it sparked my creative juices, leading to the image I ultimately chose for the project.
Every decision you make when creating an image as a photographer—from lighting, toning, subject matter, and elements in a scene—should be there for a reason. Every aspect must enhance the photo, not detract from it. Be prepared to simplify; avoid adding elements that don’t serve the idea. Again, elements must be present to support the concept.

Step Seven: Edit for Meaning, Not Perfection
When it comes to editing your images, this is where you complete the visual story. In post-production, you are enhancing the emotion, not technically balancing the image. Start using contrast, tone, and texture to emphasize the elements in your photograph. This is where consistency comes in and is key! Maintain a consistent tone throughout the series to ensure continuity, which will help the viewer and showcase a cohesive body of work.
Real-World: Lost in Orbit
One thing that helped me at the beginning of my project, Lost in Orbit, was a brief yet concise statement about the project. I would start early on coming up with a statement, as it will help. If, during the process, you begin to feel lost, it can put you back on track. Below is the statement for Lost in Orbit. Throughout the article, you have seen images from the project and behind-the-scenes content to give a glimpse into this massive year-long project.
Exercise the Brain and Eye
Pick one emotion that defines your current state.
Write a short phrase describing it.
Choose one object, color, and lighting condition that matches.
Build and photograph that concept.
Title it with a single word that captures your theme.
A Few Words of Advice
I learned many things about the process of starting a conceptual photographic project. Here are a few takeaways from this year-long journey.
You will not always be motivated to photograph.
Be flexible; things change, and the project will only improve.
You’ll find that not all ideas are great.
Shoot more images than you think you will need. Each image is a concept, and try variations.
Begin drafting your project statement. This helps, from the beginning to the end, by allowing you to have a reminder when you feel lost.
It’s overwhelming at times.
In the End
Never did I ever intend to start a conceptual photographic project—especially one that was such a personal journey and, at times, I didn’t want to share. Ultimately, it has had a tremendous impact on me. It has become an educational tool, and hopefully, if it even helps one person, it’s a mission success. A great conceptual photograph or project is more than a collection of photos telling a story. It is felt before it is seen. It all begins with an idea that is worth exploring, not a scene worth capturing—the concept a heartbeat; the camera a translator.